Fireworks
For Steven and Evita's wedding
Finished on September 2, 2016

Last summer (2016) my brother Steven got married to his wife Evita. To make the day even more special they asked me to help them create a timed fireworks show. The thrill of making stuff explode combined with the challenge of keeping it safe for all spectators made for a very interesting project.
My brother likes a bit of spectacle, so everybody was kind of expecting fireworks at his wedding. But when Steven and Evita were talking about all the other things they had planned, I knew the fireworks show would have to be really special to stand out. Money was not an issue, they said, and since they asked me almost a year in advance, time was on my side too.
Like any good project, this one too had a interesting set of requirements. They wanted about 40 pieces of fireworks to fire at set times. The pieces would be grouped together on pallets for easy transportation, but would still have to be connected quickly as not to waste any time on the big day. The controller would have to look dangerous. The original idea was to go for a plunger, but I figured I could do better (just wait and see). Everything would have to be tested for security reasons and setup easily. I saw the price tag of this system go up real quickly and decided it should be reusable. Because of this, I suggested reading the timings from an sd-card.
The boards
In hindsight, it would have been cheaper to put all the electronics in the controller. But taking reusability into account, a modular system seemed like the obvious choice. I designed a PCB which we would build 5 times. Each of these boards would go on a pallet. The boards would connect to the controller over a serial link. This way each pallet could be assembled and only one cable would have to be connected to the controller. For the serial link, I used rs-485 over a standard network cable. I had some experience with rs-485 from working with DMX lighting, the network cable and connectors I had laying around and the sockets I could buy in bulk and reuse on a later project. Just like in DMX lighting each board would get a unique address set with dip-switches.
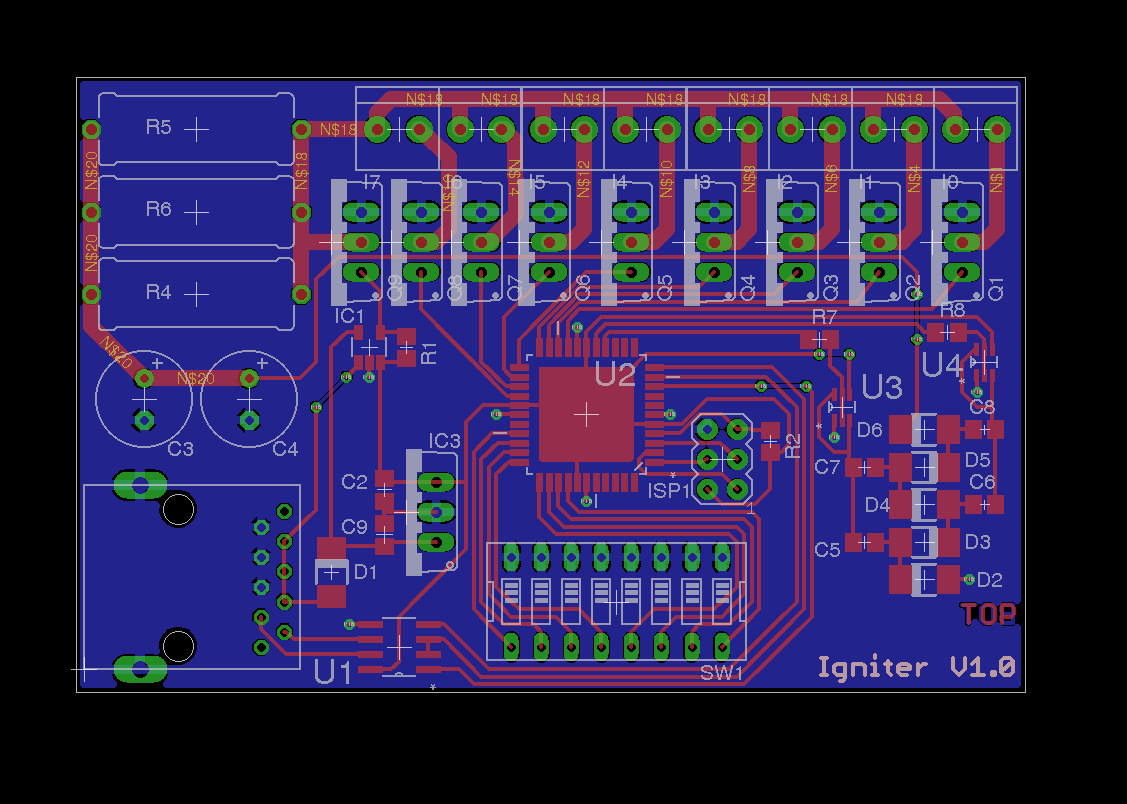
Layout of the igniter PCB.
Each board is responsible for firing 8 electric matches. To do so, it has a set of capacitors that are charged when the board is armed and discharged otherwise. Current through the MOSFETs is limited by the large resistors on the top left. To avoid the capacitors being charged with faulty software, I wanted to use a Dickson charge pump. This had the added advantage of being able to charge the capacitors over the 12V from the battery. From my tests, I knew I needed them around 20V to be able to fire two electric matches one right after the other. Unfortunately this circuit produced too much noise and I had to hook up the capacitors to the supply through a resistor. Some decoupling capacitors would have probably fixed this. I guess that's the first thing I learned and won't forget again.
To discharge the capacitors when in safety mode an extra MOSFET is provided. I added a diode before the voltage regulator and a comparator to test the supply voltage against the regulated voltage. This way, when the supply would be disconnected the capacitors would discharge anyway. The second mistake I made was to forget the comparators on the bill of materials. By the time I noticed this I had already tested the Dickson charge pumps and hooked up the capacitors to the supply voltage. Since my main safety feature was already lost, I just hooked the MOSFET up to a spare I/O pin. I was disappointed to make another compromise on safety but I was lacking time because of other projects and in my opinion this one was already expensive enough.
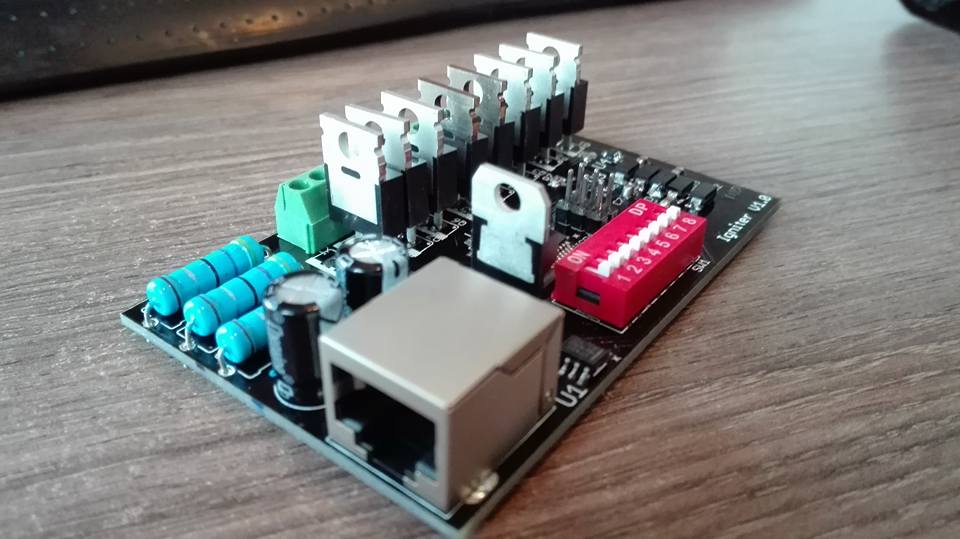
Soldered igniter PCB.
I haven't talked about the microcontroller yet. I chose an Atmel ATmega164 (you'll find the datasheet here) mostly because of its price tag. It had enough I/O pins, I didn't need a lot of memory and I already had an Atmel programmer laying around from another project. Except for the UART I didn't use any of its extra features. This was my first time soldering SMD components and it did take a couple of tries. This also explains why the whole board is such a mix of SMD and through hole components. Having worked with SMD components a couple of times now, I'm never going back. They solder faster (no cutting off pins or flipping your board all the time), are cheaper and because they are smaller your PCB gets cheaper too. The shorter leads also have less resistance and inductance.
The resulting boards were not really what I was hoping them to be. I had to make quite some compromises and a lot of extra wires were added on top. After reading up on these kinds of systems I also learned it is possible to test the connections of the electric matches by applying a small current through them. This also thought me about doing my research before starting on a PCB.
The controller
With the igniter boards finished it was time to start on the centerpiece of the show. The controller would be activated by Steven and Evita with everyone watching. The plunger idea of Steven was cool, but it didn't leave a lot of options for extra bells and whistles. I also wanted something they would really have to do together. This is why I convinced them to go for something like a suitcase nuke. There would be some switches to flip, they would each have to turn a key and press a large button together. Furthermore, a lot of blinking lights fit nicely on the controller board and the SD-card would also get a nice place. We finished off the design with a patch panel for the network cables and a battery level meter, since every explosive needs a seven segment display.
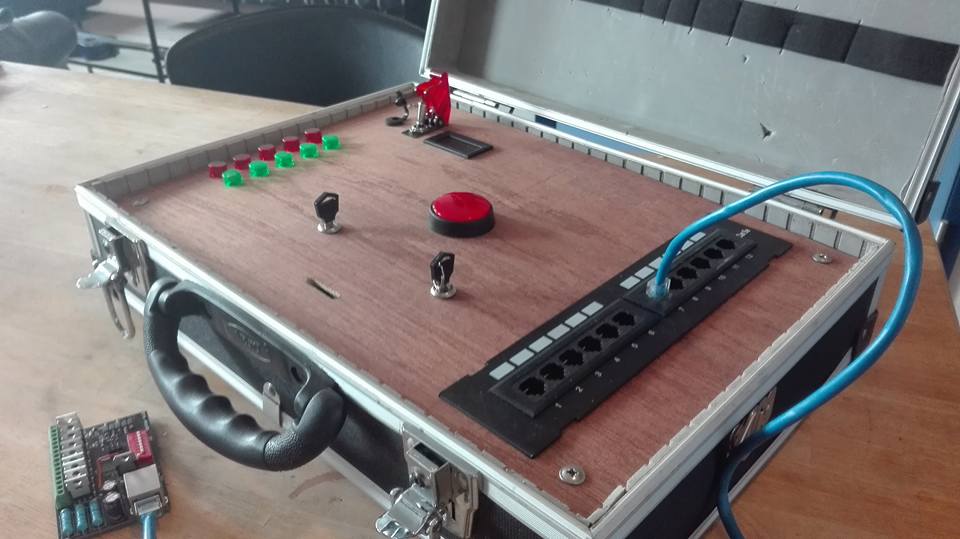
The finished controller with a single igniter PCB connected.
I ordered all components from eBay. This was by far the cheapest way to get these funny looking LEDs, buttons, switches and displays. I put them all together in this case we had lying around and the end result looked even better than expected.
Hooking it up was a bit tougher. The LEDs already had an internal resistor calculated for a 12V supply. I used an Arduino Mega to control everything because I needed all the I/O ports. This meant each LED needed a transistor to switch it. The SD-card also needed a level shifter since I only had a bare connector on a board and the rs-485 driver also needed a small PCB. I used for every module a small piece of perforated board and made sure everything would fit the Arduino easily. This way everything could be tested individually. Like any bomb the cables inside of the case where a complete mess. I wouldn't want to be the one to have to cut the red wire. Or was it the green one? And on the outside it looked even better, if that is even possible.
I had a really great time building this project. It was definetly one of the more fun projects I have done so far and I've learned a lot from it. On Steven and Evita's wedding day everything went flawlessly. The timing was perfect, every single piece got ignited and everybody had a great time. I hope they had as much fun using it as I had building the fireworks system and I would like to thank them once again for asking me to do this.